Your First AI Short Film: How to Build a Coherent Story Without the Slop
Anna needed to finish a short-film project in three days. Most of the first day went into experimenting with a handful of AI video generator tools. Each tool gave great results individually.
But there were two problems she needed to solve before she could proceed with the actual task:
Each tool worked incredibly well, but the visuals looked like apples and oranges when the frames were put together.
Within the same tool, she also wasn’t sure whether the video generator would give her consistent characters when shots changed.
Anna felt that despite being impressive, the technical fragments would never add up. Creators call this the AI Slop problem. Almost every run-of-the-mill AI video today suffers from AI slop. The pieces look stitched together and too fake to be called actual cinema.
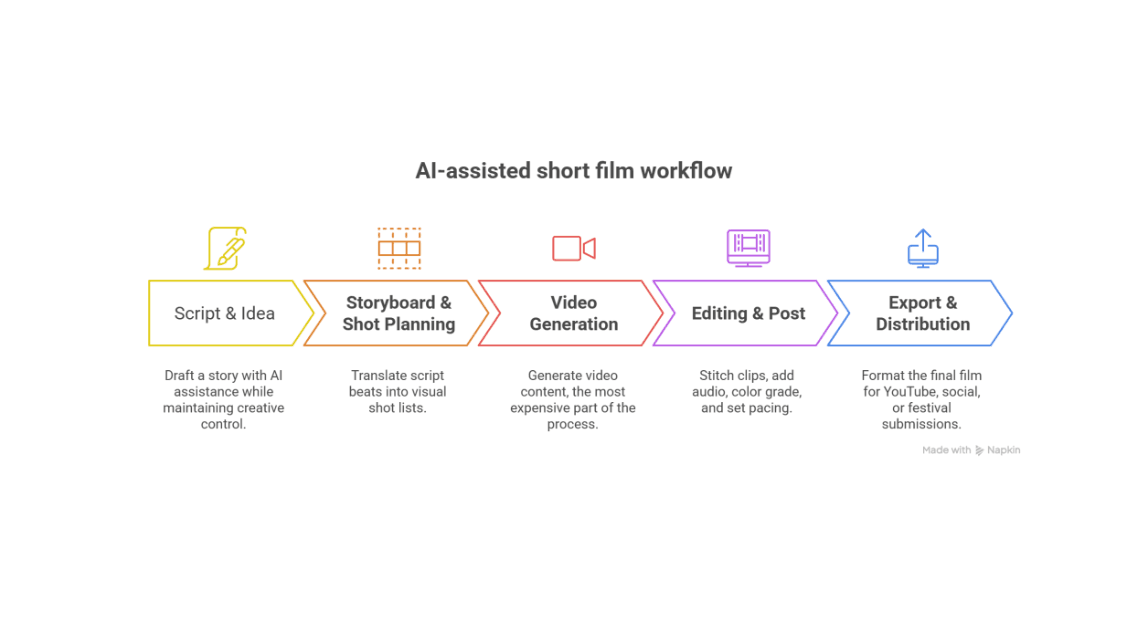
Creators should remember one thing. AI film creation isn’t a one-off task. It is a pipeline of efforts spread across scripting, storyboard, video generation, editing, and the final export.
AI-assisted film production isn’t a one-off task but an entire pipeline
This guide takes you through the entire workflow of how to create short films with AI tools, from the first idea to a finished 30–60-second cut, without your main character changing faces halfway through.
Why AI Films Fall Apart Before They're Even Edited
AI video models generate each clip in isolation, with no memory of the frames that came before it. They produce short bursts of footage, which are often only a few seconds long. Left alone, each burst invents its own version of your character. The lighting and the setting aren’t similar either.
When twenty of those heterogeneous clips are put together, there’s no harmony. It’s just a lot of visual noise in which the narrative of your story seems lost. You must explicitly feed the model a reference image or prior frame to anchor continuity. The tool has no way to remember what your character wore or how the scene was lit two clips ago.
Also, video generators have theirs strengths and weaknesses, but AI films fall apart because the creators have no plan in place.
Professionals who've worked out how to use AI in short film production in 2026 all converge on the same fix. AI-led film generation should be treated as one stage in a pipeline. The planning that happens before you generate a single frame decides whether the footage holds together.
Gabe Michael, an award-winning AI filmmaker and creative technologist, talks about his experience with AI filmmaking in his latest venture:
Synthetic-Media Labelling and rights: What creators should know
Do not treat labelling and rights as an afterthought in your film creation journey. YouTube now requires creators to disclose realistic AI-generated or AI-altered content that a viewer could mistake for something real.
YouTube enforces the rule as an automated detection feature in 2026. Every time an AI video appears on your feed, note the bottom left corner has an ‘AI’ icon to let users know. For undisclosed uploads, penalties range from removed labels to demonetization.
Other platforms and, increasingly, film festivals are tightening similar disclosure expectations. You must be sure about answers to a few questions before your film makes it to these platforms and festivals:
Who holds the rights to a fully AI-generated character's likeness across a series?
What happens if a training dataset behind a model comes under legal challenge after a film is released?
How do a festival's own AI-use disclosure rules apply to a hybrid pipeline that mixes generated footage with human-directed editing?
Though these belong in the Export & Distribution stage of the pipeline, they need to be planned for at the same time as shot lists and reference images.
Quick-Reference Table: The Five-Stage Workflow
The table below presents the whole pipeline for AI film generation as a snapshot:
Stage
Main goal
What you lock in
Typical output
1. Pre-production
Define the small story
Runtime, aspect ratio, one character, one location
A one-page creative brief
2. Character design
Stop visual drift
A reference "anchor" image and style rules
A character sheet (front, side, three-quarter)
3. Storyboarding
Turn script into shots
Shot types and camera movement
A shot-by-shot visual blueprint
4. Generation
Create motion
Same reference image + consistent prompt language
Raw video clips per shot
5. Editing & sound
Build cinematic pacing
Pacing, transitions, music, voice
The final cut
Pre-Production: Decide the Small Story Before You Touch a Tool
Gabe Michael says, “𝘌𝘷𝘦𝘳𝘺 𝘷𝘪𝘥𝘦𝘰 𝘱𝘳𝘰𝘫𝘦𝘤𝘵 𝘭𝘪𝘷𝘦𝘴 𝘰𝘳 𝘥𝘪𝘦𝘴 𝘣𝘺 𝘵𝘩𝘦 𝘴𝘤𝘳𝘪𝘱𝘵. 𝘐𝘧 𝘺𝘰𝘶𝘳 𝘴𝘵𝘰𝘳𝘺 𝘪𝘴𝘯’𝘵 𝘨𝘰𝘰𝘥, 𝘢𝘭𝘭 𝘵𝘩𝘦 𝘧𝘢𝘯𝘤𝘺 𝘵𝘦𝘤𝘩 𝘪𝘯 𝘵𝘩𝘦 𝘸𝘰𝘳𝘭𝘥 𝘸𝘰𝘯’𝘵 𝘴𝘢𝘷𝘦 𝘪𝘵.” Agree or not, pre-production requires the most thought. Without ideas and conceptual development, even the best AI creative assistant tool would produce low-quality and ill-fitting clips.
Avoid duplicating your efforts, and spend time in ideation and conceptual development. Begin by answering these three questions:
How long is the film? Thirty to sixty seconds is the realistic target for a first project.
What's the aspect ratio? Use Vertical for TikTok and Shorts, and horizontal for YouTube or a festival.
How small is the story? Opt for one character, location, and clear want.
Write this down as a short creative brief. The brief should ideally include the logline, setting, mood, and the emotional beat you want the viewer to leave with. This single page becomes the reference every later stage checks itself against.
Character Consistency: Your Anchor Scene Is Everything
Consistency is a big virtue creators keep looking for in AI generators. But character consistency is more of a planning issue. So, how do you keep your AI character looking the same until the end of your film?
Start by generating a reference image first. Let’s call it the Anchor image/scene. Use this as the visual source for every later shot. You get two benefits here: your character remains consistent, and you are saved from the effort of describing the character fresh each time.
Now, how detailed your anchor character should be?
The anchor should show your character from the front, the side, and a three-quarter angle, in the exact outfit and lighting you'll use throughout the film. Every time you generate the character again, it should point back to this same reference. That’s how the face, hair, and clothing would remain stable from the first scene to the last.
Beyond the character, what are the other non-negotiables before generating anything else?
Lighting style: Choose from warm, cold, harsh, or soft. Pick one mood and don't drift from it.
Colour palette: Pick three or four dominant colours. Repeat these colours on purpose to maintain consistency.
Camera behaviour: Decide if you want the angle to be handheld and shaky, or locked-off and formal.
These choices create character stability and a coherent visual identity across a film that was built shot by shot.
AI generators also allow you to optimise video quality using self-adjusting lighting, scene recognition and automated metadata tagging in real-time. Metadata tagging is when the AI identifies scenes, people and objects automatically to speed up post-production tasks.
From Script to Motion: Storyboards Do the Heavy Lifting
A script is only words. A storyboard turns those words into decisions a video generator can actually follow.
Traditionally, professional storyboard creation is expensive and time-consuming. Independent creators and small production houses need to devote a considerable portion of their budgets. The average cost for storyboard illustration as per industry standards is $50-$300 per frame.
Creators today can switch to storyboard generator tools, which speed up the process and can save you a considerable portion of your film budget. However, you must consider a few things before you switch to one:
Begin by breaking every line of your script into a specific shot type before you generate anything. These three shots deserve a mention:
Establishing shot: These shots set the location and mood.
Medium shot: This shows the character acting within the space.
Close-up: This specifically carries the emotional weight of the scene.
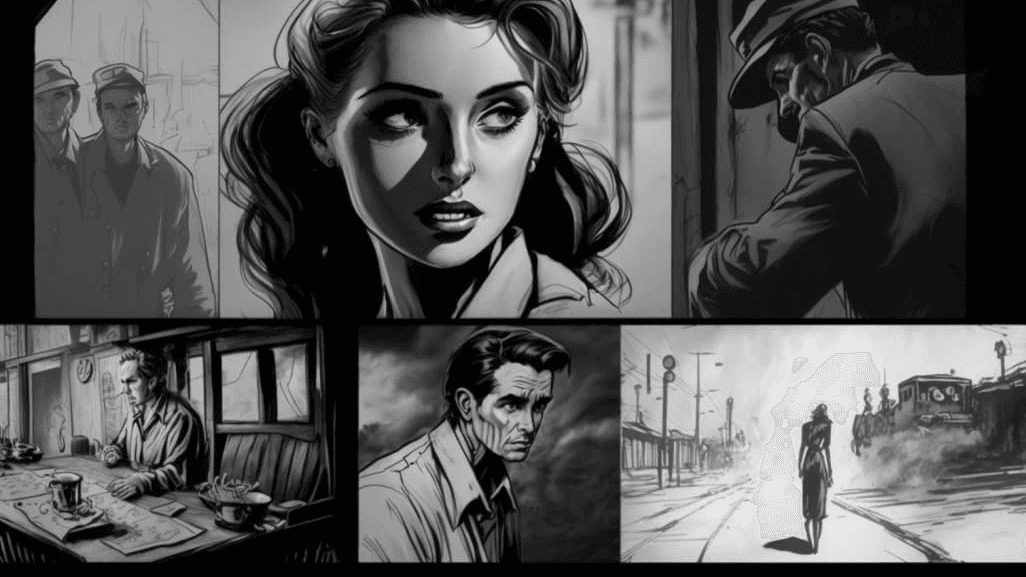
Sketch these three scenes out, even if it is a rough sketch, to give the AI tool the idea. Add a note on camera movement for each shot. These together act as a diagram that keeps scene progression logical.
1. What are popular AI generator tools charging?
Most AI video tools now run on either a monthly subscription or per-second API pricing. A hobbyist plan on Pika, Kling, or Runway's entry tier runs roughly $8-$37 a month and covers somewhere between 10 and 50 short clips.
Platform
Free Tier
Entry Plan
Mid Plan
Pro/Business
Sora 2 (ChatGPT Plus)
No
$20/mo (1,000 credits)
—
$200/mo ChatGPT Pro (10,000 credits)
Runway
Limited
$12/mo Standard
—
$76/mo Pro
Kling AI
Yes (limited)
$10/mo (660 credits)
$37/mo Pro (3,000 credits)
$92/mo Premier (8,000 credits)
Pika
Yes (limited)
$8/mo Basic
$28/mo Pro
—
Google Veo 3.1
No
$19,99/mo (Gemini Advanced)
—
$249.00/mo Business
HeyGen
Yes (limited)
$29/mo Creator
—
$149/mo Business
Synthesia
Yes (limited)
$18/mo Starter
—
$64/mo Creator
Luma AI
Yes (limited)
$29/mo Creator
—
$39/mo Team
InVideo
Yes (limited)
$35/mo Plus
—
$1,200/mo Business
ImagineArt
Yes (limited)
$11/mo Basic
—
$100/mo Pro
Source: LaoZhang.ai blog | Annual Pricing tiers of most popular AI video generator tools as of March 2026 (monthly billing is 20-30% higher)
API access is billed per second of output and ranges from about $0.05 to $0.75 depending on the model and whether audio is included.
What you must remember here is that only a few clips would come out usable on the first try. You must budget for two to four attempts per shot. You would be billed for every clip generation whether you use it or not. So be wise and choose a fast or budget tier first for prompt testing. Then switch to a premium tier for final output.
Note: If you disable native audio, you can save 30-50% in costs. However, the Google Veo 3.1 Standard plan at $0.75 allows native audio generation and 4K output. Using third-party aggregator tools can help further reduce pricing as they offer a flat-rate pricing model. For instance, FAL.ai, an aggregator, offers a flat rate of $0.15 per video.
For a 30-60 second finished film built from several short clips, you may be charged somewhere in the $15-$60 range on a subscription plan, or higher if pulling from premium per-second models for hero shots.
How to generate shots using the storyboard?
Once the boards exist, generate each shot using your locked character reference and the same lighting and colour language every time. For the storyboard itself, tools like Boords or Katalist AI let you lock a character reference early and carry it into every panel. Most first-timers skip this bit.
For the shot generation stage, Kling 3.0 is currently the strongest at holding a character's face and outfit steady across separate generations, while Runway Gen-4.5 gives more manual control if a shot needs fine-tuning rather than a full regeneration.
If a clip breaks continuity, don't sit on it for too long. Regenerate that single shot. A few other problems may crop up, including:
Anchor drift: Though you might have a locked reference image, character consistency degrades with each generation. With the 15th-20th shot, the quality is often below acceptable. If your character has drifted noticeably from the original reference, don't keep regenerating from the same worn-in prompt. Go back to the original reference image and re-anchor from it directly.
Audio and lip-sync mismatch: Models with native audio, like Veo 3.1, can still fall out of sync on dialogue-heavy shots. This problem is more noticeable when there are longer lines or overlapping speech involved. If sync breaks, it's usually faster to regenerate the shot at a shorter duration or split the line across two shots.
Content-policy refusals: If there are combat scenes involved, or there’s anything reading as a real person's likeness or some crowd or medical shots, it can trigger a flat refusal. The clip would be lost as well. You cannot find out a way by brute-forcing a new wording for the prompt. You can try rephrasing the shot around what actually needs to be visible, or try swapping models.
This is what creators call chain tooling. When a large language model runs multiple AI tools in sequence using the output from the previous prompt/tool as the input for the next, it is called chain tooling. This way, building prompt by prompt, image by image, is what people mean by prompt chaining. It is far more reliable than hoping one long prompt gets everything right in one go.
Creators comparing notes on marketing use cases have found similar lessons apply to building an AI-assisted content workflow for a team. Agree now or later, but structure and sequencing matter more than any single tool's raw output quality.
Editing and Sound: Where the Film Actually Comes Alive
Consider raw AI clips as ingredients. Editing and stitching the clips together, and fine-tuning the sound is what turns disconnected footage into something a viewer actually follows.
So, how do you fix visual inconsistency once it's already in your footage?
Begin by filling the gaps with short supporting shots, a cutaway, or a close-up on a hand or object. This way you can bridge two clips which don't quite match. Editors call these ‘coverage’ shots. Even AI-generated films need a handful of them.
If the transition appears awkward, cutting even two seconds into the transition is enough to smooth over a jump in lighting or framing that would otherwise be distracting.
You may need a few tricks under your sleeve for a proper edit pass:
Pacing: Cutting a shot half a second earlier or later changes how urgent or calm a scene feels.
Colour grading: a final pass that unifies clips generated at slightly different times into one consistent look.
Sound design: If you have sorted the voice, ambient noise, and music in your film clip, you are done with roughly half of the finished experience. It is the sound that tells the viewer how to feel about images that, on their own, might feel flat.
Skipping the anchor image: Jumping straight to generation without a locked character reference guarantees drift sooner than you get to shot three.
Over-scoping the story: Three characters and two locations in a 45-second film is a recipe for regeneration fatigue.
Ignoring technical constraints: Mixing aspect ratios or frame rates partway through creates a final cut that looks stitched together.
Treating sound as an afterthought: Add it last, but never skip it. It's doing more narrative work than most creators expect.
Editing before the boards exist: Editing decisions are much easier when every shot was planned with a purpose.
If you are eager to study how the shift toward agent-based and automated content tools has happened over the years, it is well documented. Global demand for generative AI in visual media has been tracked in detail in Research and Markets' Generative AI in Movies market report, which gives useful context for anyone treating this as more than a weekend hobby.
If you're building out a broader content pipeline around AI tools, it's also worth reading how creators are evaluating privacy-first and cloud AI tools before adopting them, and how a first script often starts with a simple AI writing assistant integrated into a workflow.
Final Cut: Where to Go From Here
Every first-time AI filmmaker starts somewhere but faces similar issues, such as too many clips, no throughline, and a character who looks like three different people. You may keep fixing every frame and so after AI generation. But the actual fix is the plan you made before the first prompt was written.
Lock your story small and your character early. Storyboard before you generate, and edit with sound as your equal partner. Do that, and you'll have made something a viewer actually remembers.
The difference between generating clips and making a film is north and south. The tools will keep improving every few months. The workflow above won't need to change nearly as often. Start with one character, one location, and one anchor image, and build outward from there.